All Resources
In this article:
minus iconplus icon
Share the Article

AWS Security Groups: Best Practices, EC2, & More

November 1, 2023
8
 Min Read
Data Security

What are AWS Security Groups?

AWS Security Groups are a vital component of AWS's network security and cloud data security. They act as a virtual firewall that controls inbound and outbound traffic to and from AWS resources. Each AWS resource, such as Amazon Elastic Compute Cloud (EC2) instances or Relational Database Service (RDS) instances, can be associated with one or more security groups.

Security groups operate at the instance level, meaning that they define rules that specify what traffic is allowed to reach the associated resources. These rules can be applied to both incoming and outgoing traffic, providing a granular way to manage access to your AWS resources.

How Do AWS Security Groups Work?

To comprehend how AWS Security Groups, in conjunction with AWS security tools, function within the AWS ecosystem, envision them as gatekeepers for inbound and outbound network traffic. These gatekeepers rely on a predefined set of rules to determine whether traffic is permitted or denied.

Here's a simplified breakdown of the process:

Inbound Traffic: When an incoming packet arrives at an AWS resource, AWS evaluates the rules defined in the associated security group. If the packet matches any of the rules allowing the traffic, it is permitted; otherwise, it is denied.

Outbound Traffic: Outbound traffic from an AWS resource is also controlled by the security group's rules. It follows the same principle: traffic is allowed or denied based on the rules defined for outbound traffic.
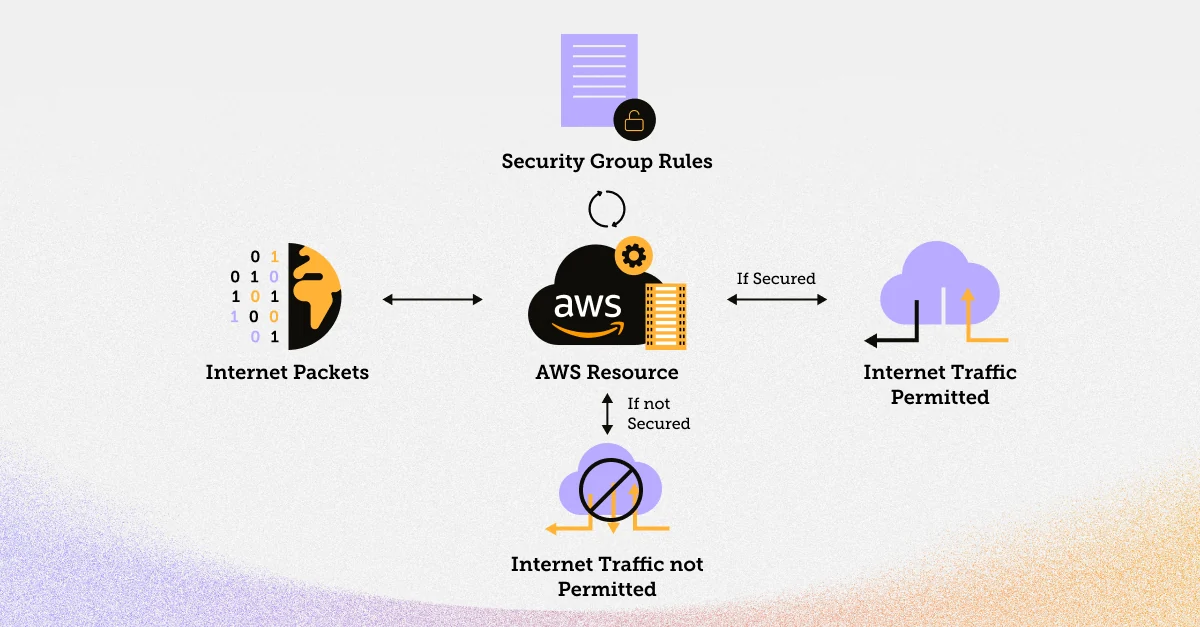
Illustration of how security groups work in AWS.

Security groups are stateful, which means that if you allow inbound traffic from a specific IP address, the corresponding outbound response traffic is automatically allowed. This simplifies rule management and ensures that related traffic is not blocked.

Types of Security Groups in AWS

There are two types of AWS Security Groups:

Types of AWS Security Groups Description
EC2-Classic Security Groups These are used with instances launched in the EC2-Classic network. It is an older network model, and AWS encourages the use of Virtual Private Cloud (VPC) for new instances.
VPC Security Groups These are used with instances launched within a Virtual Private Cloud (VPC). VPCs offer more advanced networking features and are the standard for creating isolated network environments in AWS.

For this guide, we will focus on VPC Security Groups as they are more versatile and widely used.

How to Use Multiple Security Groups in AWS

In AWS, you can associate multiple security groups with a single resource. When multiple security groups are associated with an instance, AWS combines their rules. This is done in a way that allows for flexibility and ease of management. The rules are evaluated as follows:

  • Union: Rules from different security groups are merged. If any security group allows the traffic, it is permitted.
  • Deny Overrides Allow: If a rule in one security group denies the traffic, it takes precedence over any rule that allows the traffic in another security group.
  • Default Deny: If a packet doesn't match any rule, it is denied by default.

Let's explore how to create, manage, and configure security groups in AWS.

Security Groups and Network ACLs

Before diving into security group creation, it's essential to understand the difference between security groups and Network Access Control Lists (NACLs). While both are used to control inbound and outbound traffic, they operate at different levels.

Security Groups: These operate at the instance level, filtering traffic to and from the resources (e.g., EC2 instances). They are stateful, which means that if you allow incoming traffic from a specific IP, outbound response traffic is automatically allowed.

Network ACLs (NACLs): These operate at the subnet level and act as stateless traffic filters. NACLs define rules for all resources within a subnet, and they do not automatically allow response traffic.
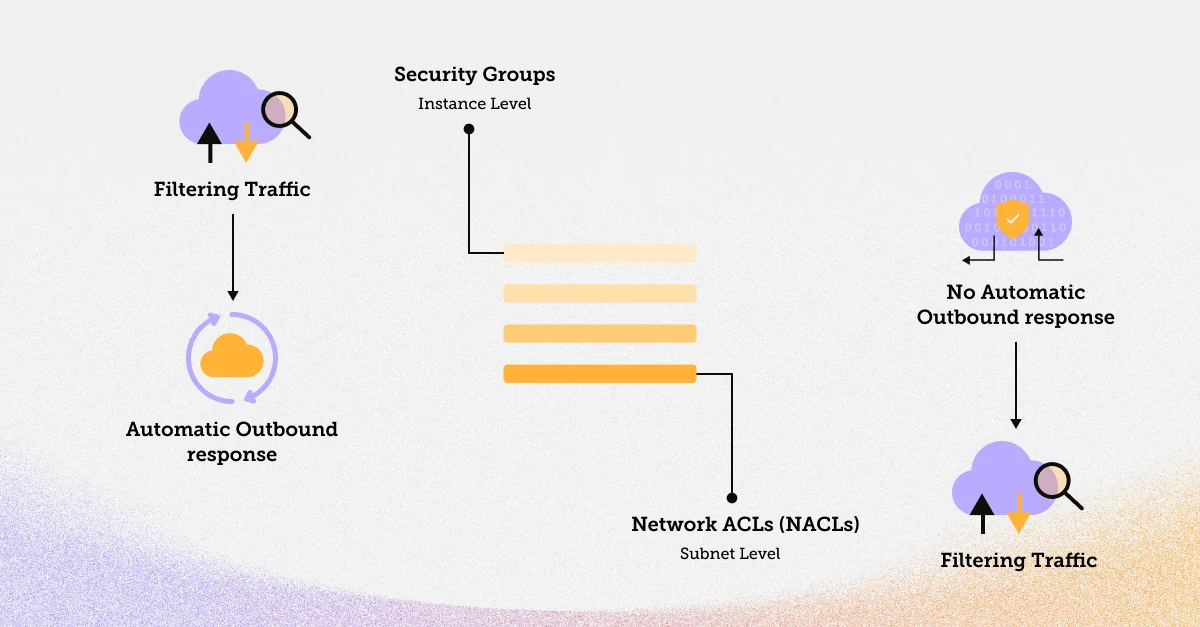
 Illustration of how security groups and Network ACLs work.

For the most granular control over traffic, use security groups for instance-level security and NACLs for subnet-level security.

AWS Security Groups Outbound Rules

AWS Security Groups are defined by a set of rules that specify which traffic is allowed and which is denied. Each rule consists of the following components:

  • Type: The protocol type (e.g., TCP, UDP, ICMP) to which the rule applies.
  • Port Range: The range of ports to which the rule applies.
  • Source/Destination: The IP range or security group that is allowed to access the resource.
  • Allow/Deny: Whether the rule allows or denies traffic that matches the rule criteria.

Now, let's look at how to create a security group in AWS.

Creating a Security Group in AWS

To create a security group in AWS (through the console), follow these steps:

Steps Description
Sign in to the AWS Management Console Log in to your AWS account.
Navigate to the EC2 Dashboard Select the "EC2" service.
Access the Security Groups Section In the EC2 Dashboard, under the "Network & Security" category, click on "Security Groups" in the navigation pane on the left.
Create a New Security Group Click the "Create Security Group" button.
Configure Security Group Settings
  • Security Group Name: Give your security group a descriptive name.
  • Description: Provide a brief description of the security group's purpose.
  • Add Inbound Rules: Under the "Inbound Rules" section, define rules for incoming traffic. Click the "Add Rule" button and specify the type, port range, and source IP or security group.
Add Outbound Rules Similarly, add rules for outbound traffic under the "Outbound Rules" section.
Review and Create Double-check your rule settings and click "Create Security Group."

Your security group is now created and ready to be associated with AWS resources.

Below, we'll demonstrate how to create a security group using the AWS CLI.

 
aws ec2 create-security-group --group-name MySecurityGroup --description
"My Security Group"

In the above command:

--group-name specifies the name of your security group.

--description provides a brief description of the security group.

After executing this command, AWS will return the security group's unique identifier, which is used to reference the security group in subsequent commands.

Adding a Rule to a Security Group

Once your security group is created, you can easily add, edit, or remove rules. To add a new rule to an existing security group through a console, follow these steps:

  1. Select the security group you want to modify in the EC2 Dashboard.
  2. In the "Inbound Rules" or "Outbound Rules" tab, click the "Edit Inbound Rules" or "Edit Outbound Rules" button.
  3. Click the "Add Rule" button.
  4. Define the rule with the appropriate type, port range, and source/destination.
  5. Click "Save Rules."

To create a Security Group, you can also use the create-security-group command, specifying a name and description. After creating the Security Group, you can add rules to it using the authorize-security-group-ingress and authorize-security-group-egress commands. The code snippet below adds an inbound rule to allow SSH traffic from a specific IP address range.

 
# Create a new Security Group
aws ec2 create-security-group --group-name MySecurityGroup --description "My Security Group"

# Add an inbound rule to allow SSH traffic from a specific IP address
aws ec2 authorize-security-group-ingress --group-id sg-0123456789abcdef0 --protocol tcp --port 22 --cidr 203.0.113.0/24

Assigning a Security Group to an EC2 Instance

To secure your EC2 instances using security groups through the console, follow these steps:

  1. Navigate to the EC2 Dashboard in the AWS Management Console.
  2. Select the EC2 instance to which you want to assign a security group.
  3. Click the "Actions" button, choose "Networking," and then click "Change Security Groups."
  4. In the "Assign Security Groups" dialog, select the desired security group(s) and click "Save."

Your EC2 instance is now associated with the selected security group(s), and its inbound and outbound traffic is governed by the rules defined in those groups.

 
# Launch an EC2 instance and associate it with a Security Group
aws ec2 run-instances --image-id ami-12345678 --count 1 --instance-type t2.micro --key-name MyKeyPair --security-group-ids sg-0123456789abcdef0

When launching an EC2 instance, you can specify the Security Groups to associate with it. In the example above, we associate the instance with a Security Group using the --security-group-ids flag.

Deleting a Security Group

To delete a security group via the AWS Management Console, follow these steps:

  1. In the EC2 Dashboard, select the security group you wish to delete.
  2. Check for associated instances and disassociate them, if necessary.
  3. Click the "Actions" button, and choose "Delete Security Group."
  4. Confirm the deletion when prompted.
  5. Receive confirmation of the security group's removal.
 
# Delete a Security Group
aws ec2 delete-security-group --group-id sg-0123456789abcdef0

To delete a Security Group, you can use the delete-security-group command and specify the Security Group's ID through AWS CLI.

AWS Security Groups Best Practices

Here are some additional best practices to keep in mind when working with AWS Security Groups:

Enable Tracking and Alerting

One best practice is to enable tracking and alerting for changes made to your Security Groups. AWS provides a feature called AWS Config, which allows you to track changes to your AWS resources, including Security Groups. By setting up AWS Config, you can receive notifications when changes occur, helping you detect and respond to any unauthorized modifications quickly.

Delete Unused Security Groups

Over time, you may end up with unused or redundant Security Groups in your AWS environment. It's essential to regularly review your Security Groups and delete any that are no longer needed. This reduces the complexity of your security policies and minimizes the risk of accidental misconfigurations.

Avoid Incoming Traffic Through 0.0.0.0/0

One common mistake in Security Group configurations is allowing incoming traffic from '0.0.0.0/0,' which essentially opens up your resources to the entire internet. It's best to avoid this practice unless you have a specific use case that requires it. Instead, restrict incoming traffic to only the IP addresses or IP ranges necessary for your applications.

Use Descriptive Rule Names

When creating Security Group rules, provide descriptive names that make it clear why the rule exists. This simplifies rule management and auditing.

Implement Least Privilege

Follow the principle of least privilege by allowing only the minimum required access to your resources. Avoid overly permissive rules.

Regularly Review and Update Rules

Your security requirements may change over time. Regularly review and update your Security Group rules to adapt to evolving security needs.

Avoid Using Security Group Rules as the Only Layer of Defense

Security Groups are a crucial part of your defense, but they should not be your only layer of security. Combine them with other security measures, such as NACLs and web application firewalls, for a comprehensive security strategy.

Leverage AWS Identity and Access Management (IAM)

Use AWS IAM to control access to AWS services and resources. IAM roles and policies can provide fine-grained control over who can modify Security Groups and other AWS resources.

Implement Network Segmentation

Use different Security Groups for different tiers of your application, such as web servers, application servers, and databases. This helps in implementing network segmentation and ensuring that resources only communicate as necessary.

Regularly Audit and Monitor

Set up auditing and monitoring tools to detect and respond to security incidents promptly. AWS provides services like AWS CloudWatch and AWS CloudTrail for this purpose.

Conclusion

Securing your cloud environment is paramount when using AWS, and Security Groups play a vital role in achieving this goal. By understanding how Security Groups work, creating and managing rules, and following best practices, you can enhance the security of your AWS resources. Remember to regularly review and update your security group configurations to adapt to changing security requirements and maintain a robust defense against potential threats. With the right approach to AWS Security Groups, you can confidently embrace the benefits of cloud computing while ensuring the safety and integrity of your applications and data.

Discover Ron’s expertise, shaped by over 20 years of hands-on tech and leadership experience in cybersecurity, cloud, big data, and machine learning. As a serial entrepreneur and seed investor, Ron has contributed to the success of several startups, including Axonius, Firefly, Guardio, Talon Cyber Security, and Lightricks, after founding a company acquired by Oracle.

Subscribe

Latest Blog Posts

Yair Cohen
January 28, 2025
5
Min Read
Data Security

Data Protection and Classification in Microsoft 365

Data Protection and Classification in Microsoft 365

Imagine the fallout of a single misstep—a phishing scam tricking an employee into sharing sensitive data. The breach doesn’t just compromise information; it shakes trust, tarnishes reputations, and invites compliance penalties. With data breaches on the rise, safeguarding your organization’s Microsoft 365 environment has never been more critical.

Data classification helps prevent such disasters. This article provides a clear roadmap for protecting and classifying Microsoft 365 data. It explores how data is saved and classified, discusses built-in tools for protection, and covers best practices for maintaining  Microsoft 365 data protection.

How Is Data Saved and Classified in Microsoft 365? 

Microsoft 365 stores data across tools and services. For example, emails are stored in Exchange Online, while documents and data for collaboration are found in Sharepoint and Teams, and documents or files for individual users are stored in OneDrive. This data is primarily unstructured—a format ideal for documents and images but challenging for identifying sensitive information.

All of this data is largely stored in an unstructured format typically used for documents and images. This format not only allows organizations to store large volumes of data efficiently; it also enables seamless collaboration across teams and departments. However, as unstructured data cannot be neatly categorized into tables or columns, it becomes cumbersome to discern what data is sensitive and where it is stored. 

To address this, Microsoft 365 offers a data classification dashboard that helps classify data of varying levels of sensitivity and data governed by different regulatory compliance frameworks. But how does Microsoft identify sensitive information with unstructured data? 

Microsoft employs advanced technologies such as RegEx scans, trainable classifiers, Bloom filters, and data classification graphs to identify and classify data as public, internal, or confidential. Once classified, data protection and governance policies are applied based on sensitivity and retention labels.

Data classification is vital for understanding, protecting, and governing data. With your ​​Microsoft 365 data classified appropriately, you can ensure seamless collaboration without risking data exposure.

Why data classification is important
Figure 1: Why data classification is important

Microsoft 365 Data Protection and Classification Tools

Microsoft 365 includes several key tools and frameworks for classifying and securing data. Here are a few. 

Microsoft Purview 

Microsoft Purview is a cornerstone of data classification and protection within Microsoft 365.

Key Features: 

  • Over 200+ prebuilt classifiers and the ability to create custom classifiers tailored to specific business needs.
  • Purview auto-classifies data across Microsoft 365 and other supported apps, such as Adobe Photoshop and Adobe PDF, while users work on them.
  • Sensitivity labels that apply encryption, watermarks, and access restrictions to secure sensitive data.
  • Double Key Encryption to ensure that sensitivity labels persist even when file formats change.
Sensitivity watermarks in M365
Figure 2: Sensitivity watermarks in Microsoft 365 (Source: Microsoft)
Figure 3: Sensitivity labels for information protection policies in Microsoft 365 (Source: Microsoft)

Purview autonomously applies sensitivity labels like "confidential" or "highly confidential" based on preconfigured policies, ensuring optimal access control. These labels persist even when files are shared or converted to other formats, such as from Word to PDF.

Additionally, Purview’s data loss prevention (DLP) policies prevent unauthorized sharing or deletion of sensitive data by flagging and reporting violations in real time. For example, if a sensitive file is shared externally, Purview can immediately block the transfer and alert your security team.

Sensitivity labeling for announcements in M365
Figure 4: Preventing data loss by using sensitivity labels (Source: Microsoft)

Microsoft Defender 

Microsoft Defender for Cloud Apps strengthens security by providing a cloud app discovery window to identify applications accessing data. Once identified, it classifies files within these applications based on sensitivity, applying appropriate protections as per preconfigured policies.

Microsoft Defender for Cloud - data sensitivity classification
Figure 5: Microsoft Defender data sensitivity classification (Source: Microsoft)

Key Features:

  • Data Sensitivity Classification: Defender identifies sensitive files and assigns protection based on sensitivity levels, ensuring compliance and reducing risk. For example, it labels files containing credit card numbers, personal identifiers, or confidential business information with sensitivity classifications like "Highly Confidential."
  • Threat Detection and Response: Defender detects known threats targeted at sensitive data in emails, collaboration tools (like SharePoint and Teams), URLs, file attachments, and OneDrive. If an admin account is compromised, Microsoft Defender immediately spots the threat, disables the account, and notifies your IT team to prevent significant damage.
  • Automation: Defender automates incident response, ensuring that malicious activities are flagged and remediated promptly.

Intune 

Microsoft Intune provides comprehensive device management and data protection, enabling organizations to enforce policies that safeguard sensitive information on both managed and unmanaged smartphones, computers, and other devices.

Key Features:

  • Customizable Compliance Policies: Intune allows organizations to enforce device compliance policies that align with internal and regulatory standards. For example, it can block non-compliant devices from accessing sensitive data until issues are resolved.
  • Data Access Control: Intune disallows employees from accessing corporate data on compromised devices or through insecure apps, such as those not using encryption for emails.
  • Endpoint Security Management: By integrating with Microsoft Defender, Intune provides endpoint protection and automated responses to detected threats, ensuring only secure devices can access your organization’s network.
Endpoint security overview
Figure 6: Intune device management portal (Source: Microsoft)

Intune supports organizations by enabling the creation and enforcement of device compliance policies tailored to both internal and regulatory standards. These policies detect non-compliant devices, issue alerts, and restrict access to sensitive data until compliance is restored. Conditional access ensures that only secure and compliant devices connect to your network.

Microsoft 365-managed apps like Outlook, Word, and Excel. These policies define which apps can access specific data, such as emails, and regulate permissible actions, including copying, pasting, forwarding, and taking screenshots. This layered security approach safeguards critical information while maintaining seamless app functionality.

Does Microsoft have a DLP Solution?

Microsoft 365’s data loss prevention (DLP) policies represent the implementation of the zero-trust framework. These policies aim to prevent oversharing, accidental deletion, and data leaks across Microsoft 365 services, including Exchange Online, SharePoint, Teams, and OneDrive, as well as Windows and macOS devices.

Retention policies, deployed via retention labels, help organizations manage the data lifecycle effectively.These labels ensure that data is retained only as long as necessary to meet compliance requirements, reducing the risks associated with prolonged data storage.

How DLP policies work
Figure 7: How DLP policies work (Source: Microsoft)

What is the Microsoft 365 Compliance Center?

The Microsoft 365 compliance center offers tools to manage policies and monitor data access, ensuring adherence to regulations. For example, DLP policies allow organizations to define specific automated responses when certain regulatory requirements—like GDPR or HIPAA—are violated.

Microsoft Purview Compliance Portal: This portal ensures sensitive data is classified, stored, retained, and used in adherence to relevant compliance regulations. Meanwhile, Microsoft 365’s MPIP ensures that only authorized users can access sensitive information, whether collaborating on Teams or sharing files in SharePoint. Together, these tools enable secure collaboration while keeping regulatory compliance at the forefront.

12 Best Practices for Microsoft 365 Data Protection and Classification

To achieve effective Microsoft 365 data protection and classification, organizations should follow these steps:

  1. Create precise labels, tags, and classification policies; don’t rely solely on prebuilt labels and policies, as definitions of sensitive data may vary by context.
  2. Automate labeling to minimize errors and quickly capture new datasets.
  3. Establish and enforce data use policies and guardrails automatically to reduce risks of data breaches, compliance failures, and insider threat risks. 
  4. Regularly review and update data classification and usage policies to reflect evolving threats, new data storage, and changing compliance laws.o policies must stay up to date to remain effective.
  5. Define context-appropriate DLP policies based on your business needs; factoring in remote work, ease of collaboration, regional compliance standards, etc.
  6. Apply encryption to safeguard data inside and outside your organization.
  7. Enforce role-based access controls (RBAC) and least privilege principles to ensure users only have access to data and can perform actions within the scope of their roles. This limits the risk of accidental data exposure, deletion, and cyberattacks.
  8. Create audit trails of user activity around data and maintain version histories to prevent and track data loss.
  9. Follow the 3-2-1 backup rule: keep three copies of your data, store two on different media, and one offsite.
  10. Leverage the full suite of Microsoft 365 tools to monitor sensitive data, detect real-time threats, and secure information effectively.
  11. Promptly resolve detected risks to mitigate attacks early.
  12. Ensure data protection and classification policies do not impede collaboration to prevent teams from creating shadow data, which puts your organization at risk of data breaches.

For example, consider #3. If a disgruntled employee starts transferring sensitive intellectual property to external devices in preparation for a ransomware attack, having the right data use policies in place will allow your organization to stop the threat before it escalates. 

Microsoft 365 Data Protection and Classification Limitations

Despite Microsoft 365’s array of tools, there are some key gaps. AI/ML-powered data security posture management (DSPM) and data detection and response (DDR) solutions fill these easily.

The top limitations of Microsoft 365 data protection and classification are the following:

  • Limitations Handling Large Volumes of Unstructured Data: Purview struggles to automatically classify and apply sensitivity labels to diverse and vast datasets, particularly in Azure services or non-Microsoft clouds. 
  • Contextless Data Classification: Without considering context, Microsoft Purview’s MPIP can lead to false positives (over-labeling non-sensitive data) or false negatives (missing sensitive data). 
  • Inconsistent Labeling Across Providers: Microsoft tools are limited to its ecosystem, making it difficult for enterprises using multi-cloud environments to enforce consistent organization-wide labeling.
  • Minimal Threat Response Capabilities: Microsoft Defender relies heavily on IT teams for remediation and lacks robust autonomous responses.
  • Sporadic Interruption of User Activity: Inaccurate DLP classifications can disrupt legitimate data transfers in collaboration channels, frustrating employees and increasing the risk of shadow IT workarounds.

Sentra Fills the Gap: Protection Measures to Address Microsoft 365 Data Risks

Today’s businesses must get ahead of data risks by instituting Microsoft 365 data protection and classification best practices such as least privilege access and encryption. Otherwise, they risk data exposure, damaging cyberattacks, and hefty compliance fines. However, implementing these best practices depends on accurate and context-sensitive data classification in Microsoft 365. 

Sentra’s Cloud-native Data Security Platform enables secure collaboration and file sharing across all Microsoft 365 services including SharePoint, OneDrive, Teams, OneNote, Office, Word, Excel, and more. Sentra provides data access governance, shadow data detection, and privacy audit automation for M365 data. It also evaluates risks and alerts for policy or regulatory violations.

Specifically, Sentra complements Purview in the following ways:

  1. Sentra Data Detection & Response (DDR): Continuously monitors for threats such as data exfiltration, weakening of data security posture, and other suspicious activities in real time. While Purview Insider Risk Management focuses on M365 applications, Sentra DDR extends these capabilities to Azure and non-Microsoft applications.
  2. Data Perimeter Protection: Sentra automatically detects and identifies an organization’s data perimeters across M365, Azure, and non-Microsoft clouds. It alerts “organizations when sensitive data leaves its boundaries, regardless of how it is copied or exported.
  3. Shadow Data Reduction: Using context-based analysis powered by Sentra’s DataTreks™, the platform identifies unnecessary shadow data, reducing the attack surface and improving data governance.
  4. Training Data Monitoring: Sentra monitors training datasets continuously, identifying privacy violations of sensitive PII or real-time threats like training data poisoning or suspicious access.
  5. Data Access Governance: Sentra adds to Purview’s data catalog by including metadata on users and applications with data access permissions, ensuring better governance.
  6. Automated Privacy Assessments: Sentra automates privacy evaluations aligned with frameworks like GDPR and CCPA, seamlessly integrating them into Purview’s data catalog.
  7. Rich Contextual Insights: Sentra delivers detailed data context to understand usage, sensitivity, movement, and unique data types. These insights enable precise risk evaluation, threat prioritization, and remediation, and they can be consumed via an API by DLP systems, SIEMs, and other tools.

By addressing these gaps, Sentra empowers organizations to enhance their Microsoft 365 data protection and classification strategies. Request a demo to experience Sentra’s innovative solutions firsthand.

Read More
Team Sentra
December 26, 2024
5
Min Read
Data Security

Create an Effective RFP for a Data Security Platform & DSPM

Create an Effective RFP for a Data Security Platform & DSPM

This RFP Guide is designed to help organizations create their own RFP for selection of Cloud-native Data Security Platform (DSP) & Data Security Posture Management (DSPM) solutions. The purpose is to identify key essential requirements  that will enable effective discovery, classification, and protection of sensitive data across complex environments, including in public cloud infrastructures and in on-premises environments.

Instructions for Vendors

Each section provides essential and recommended requirements to achieve a best practice capability. These have been accumulated over dozens of customer implementations.  Customers may also wish to include their own unique requirements specific to their industry or data environment.

1. Data Discovery & Classification

Requirement Details
Shadow Data Detection Can the solution discover and identify shadow data across any data environment (IaaS, PaaS, SaaS, OnPrem)?
Sensitive Data Classification Can the solution accurately classify sensitive data, including PII, financial data, and healthcare data?
Efficient Scanning Does the solution support smart sampling of large file shares and data lakes to reduce and optimize the cost of scanning, yet provide full scan coverage in less time and lower cloud compute costs?
AI-based Classification Does the solution leverage AI/ML to classify data in unstructured documents and stores (Google Drive, OneDrive, SharePoint, etc) and achieve more than 95% accuracy?
Data Context Can the solution discern and ‘learn’ the business purpose (employee data, customer data, identifiable data subjects, legal data, synthetic data, etc.) of data elements and tag them accordingly?
Data Store Compatibility Which data stores (e.g., AWS S3, Google Cloud Storage, Azure SQL, Snowflake data warehouse, On Premises file shares, etc.) does the solution support for discovery?
Autonomous Discovery Can the solution discover sensitive data automatically and continuously, ensuring up to date awareness of data presence?
Data Perimeters Monitoring Can the solution track data movement between storage solutions and detect risky and non-compliant data transfers and data sprawl?

2. Data Access Governance

Requirement Details
Access Controls Does the solution map access of users and non-human identities to data based on sensitivity and sensitive information types?
Location Independent Control Does the solution help organizations apply least privilege access regardless of data location or movement?
Identity Activity Monitoring Does the solution identify over-provisioned, unused or abandoned identities (users, keys, secrets) that create unnecessary exposures?
Data Access Catalog Does the solution provide an intuitive map of identities, their access entitlements (read/write permissions), and the sensitive data they can access?
Integration with IAM Providers Does the solution integrate with existing Identity and Access Management (IAM) systems?

3. Posture, Risk Assessment & Threat Monitoring

Requirement Details
Risk Assessment Can the solution assess data security risks and assign risk scores based on data exposure and data sensitivity?
Compliance Frameworks Does the solution support compliance with regulatory requirements such as GDPR, CCPA, and HIPAA?
Similar Data Detection Does the solution identify data that has been copied, moved, transformed or otherwise modified that may disguise its sensitivity or lessen its security posture?
Automated Alerts Does the solution provide automated alerts for policy violations and potential data breaches?
Data Loss Prevention (DLP) Does the solution include DLP features to prevent unauthorized data exfiltration?
3rd Party Data Loss Prevention (DLP) Does the solution integrate with 3rd party DLP solutions?
User Behavior Monitoring Does the solution track and analyze user behaviors to identify potential insider threats or malicious activity?
Anomaly Detection Does the solution establish a baseline and use machine learning or AI to detect anomalies in data access or movement?

4. Incident Response & Remediation

Requirement Details
Incident Management Can the solution provide detailed reports, alert details, and activity/change history logs for incident investigation?
Automated Response Does the solution support automated incident response, such as blocking malicious users or stopping unauthorized data flows (via API integration to native cloud tools or other)?
Forensic Capabilities Can the solution facilitate forensic investigation, such as data access trails and root cause analysis?
Integration with SIEM Can the solution integrate with existing Security Information and Event Management (SIEM) or other analysis systems?

5. Infrastructure & Deployment

Requirement Details
Deployment Models Does the solution support flexible deployment models (on-premise, cloud, hybrid)? Is the solution agentless?
Cloud Native Does the solution keep all data in the customer’s environment, performing classification via serverless functions? (ie. no data is ever removed from customer environment - only metadata)
Scalability Can the solution scale to meet the demands of large enterprises with multi-petabyte data volumes?
Performance Impact Does the solution work asynchronously without performance impact on the data production environment?
Multi-Cloud Support Does the solution provide unified visibility and management across multiple cloud providers and hybrid environments?

6. Operations & Support

Requirement Details
Onboarding Does the solution vendor assist customers with onboarding? Does this include assistance with customization of policies, classifiers, or other settings?
24/7 Support Does the vendor provide 24/7 support for addressing urgent security issues?
Training & Documentation Does the vendor provide training and detailed documentation for implementation and operation?
Managed Services Does the vendor (or its partners) offer managed services for organizations without dedicated security teams?
Integration with Security Tools Can the solution integrate with existing security tools, such as firewalls, DLP systems, and endpoint protection systems?

7. Pricing & Licensing

Requirement Details
Pricing Model What is the pricing structure (e.g., per user, per GB, per endpoint)?
Licensing What licensing options are available (e.g., subscription, perpetual)?
Additional Costs Are there additional costs for support, maintenance, or feature upgrades?

Conclusion

This RFP template is designed to facilitate a structured and efficient evaluation of DSP and DSPM solutions. Vendors are encouraged to provide comprehensive and transparent responses to ensure an accurate assessment of their solution’s capabilities.

Sentra’s cloud-native design combines powerful Data Discovery and Classification, DSPM, DAG, and DDR capabilities into a complete Data Security Platform (DSP). With this, Sentra customers achieve enterprise-scale data protection and do so very efficiently - without creating undue burdens on the personnel who must manage it.

To learn more about Sentra’s DSP, request a demo here and choose a time for a meeting with our data security experts. You can also choose to download the RFP as a pdf.

Read More
Gilad Golani
December 16, 2024
4
Min Read
Data Security

Best Practices: Automatically Tag and Label Sensitive Data

Best Practices: Automatically Tag and Label Sensitive Data

The Importance of Data Labeling and Tagging

In today's fast-paced business environment, data rarely stays in one place. It moves across devices, applications, and services as individuals collaborate with internal teams and external partners. This mobility is essential for productivity but poses a challenge: how can you ensure your data remains secure and compliant with business and regulatory requirements when it's constantly on the move?

Why Labeling and Tagging Data Matters

Data labeling and tagging provide a critical solution to this challenge. By assigning sensitivity labels to your data, you can define its importance and security level within your organization. These labels act as identifiers that abstract the content itself, enabling you to manage and track the data type without directly exposing sensitive information. With the right labeling, organizations can also control access in real-time.

For example, labeling a document containing social security numbers or credit card information as Highly Confidential allows your organization to acknowledge the data's sensitivity and enforce appropriate protections, all without needing to access or expose the actual contents.

Why Sentra’s AI-Based Classification Is a Game-Changer

Sentra’s AI-based classification technology enhances data security by ensuring that the sensitivity labels are applied with exceptional accuracy. Leveraging advanced LLM models, Sentra enhances data classification with context-aware capabilities, such as:

  • Detecting the geographic residency of data subjects.
  • Differentiating between Customer Data and Employee Data.
  • Identifying and treating Synthetic or Mock Data differently from real sensitive data.

This context-based approach eliminates the inefficiencies of manual processes and seamlessly scales to meet the demands of modern, complex data environments. By integrating AI into the classification process, Sentra empowers teams to confidently and consistently protect their data—ensuring sensitive information remains secure, no matter where it resides or how it is accessed.

Benefits of Labeling and Tagging in Sentra

Sentra enhances your ability to classify and secure data by automatically applying sensitivity labels to data assets. By automating this process, Sentra removes the manual effort required from each team member—achieving accuracy that’s only possible through a deep understanding of what data is sensitive and its broader context.

Here are some key benefits of labeling and tagging in Sentra:

  1. Enhanced Security and Loss Prevention: Sentra’s integration with Data Loss Prevention (DLP) solutions prevents the loss of sensitive and critical data by applying the right sensitivity labels. Sentra’s granular, contextual tags help to provide the detail necessary to action remediation automatically so that operations can scale.
  2. Easily Build Your Tagging Rules: Sentra’s Intuitive Rule Builder allows you to automatically apply sensitivity labels to assets based on your pre-existing tagging rules and or define new ones via the builder UI (see screen below). Sentra imports discovered Microsoft Purview Information Protection (MPIP) labels to speed this process.
  1. Labels Move with the Data: Sensitivity labels created in Sentra can be mapped to Microsoft Purview Information Protection (MPIP) labels and applied to various applications like SharePoint, OneDrive, Teams, Amazon S3, and Azure Blob Containers. Once applied, labels are stored as metadata and travel with the file or data wherever it goes, ensuring consistent protection across platforms and services.
  2. Automatic Labeling: Sentra allows for the automatic application of sensitivity labels based on the data's content. Auto-tagging rules, configured for each sensitivity label, determine which label should be applied during scans for sensitive information.
  3. Support for Structured and Unstructured Data: Sentra enables labeling for files stored in cloud environments such as Amazon S3 or EBS volumes and for database columns in structured data environments like Amazon RDS. By implementing these labeling practices, your organization can track, manage, and protect data with ease while maintaining compliance and safeguarding sensitive information. Whether collaborating across services or storing data in diverse cloud environments, Sentra ensures your labels and protection follow the data wherever it goes.

Applying Sensitivity Labels to Data Assets in Sentra

In today’s rapidly evolving data security landscape, ensuring that your data is properly classified and protected is crucial. One effective way to achieve this is by applying sensitivity labels to your data assets. Sensitivity labels help ensure that data is handled according to its level of sensitivity, reducing the risk of accidental exposure and enabling compliance with data protection regulations.

Below, we’ll walk you through the necessary steps to automatically apply sensitivity labels to your data assets in Sentra. By following these steps, you can enhance your data governance, improve data security, and maintain clear visibility over your organization's sensitive information.

The process involves three key actions:

  1. Create Sensitivity Labels: The first step in applying sensitivity labels is creating them within Sentra. These labels allow you to categorize data assets according to various rules and classifications. Once set up, these labels will automatically apply to data assets based on predefined criteria, such as the types of classifications detected within the data. Sensitivity labels help ensure that sensitive information is properly identified and protected.
  2. Connect Accounts with Data Assets: The next step is to connect your accounts with the relevant data assets. This integration allows Sentra to automatically discover and continuously scan all your data assets, ensuring that no data goes unnoticed. As new data is created or modified, Sentra will promptly detect and categorize it, keeping your data classification up to date and reducing manual efforts.
  3. Apply Classification Tags: Whenever a data asset is scanned, Sentra will automatically apply classification tags to it, such as data classes, data contexts, and sensitivity labels. These tags are visible in Sentra’s data catalog, giving you a comprehensive overview of your data’s classification status. By applying these tags consistently across all your data assets, you’ll have a clear, automated way to manage sensitive data, ensuring compliance and security.

By following these steps, you can streamline your data classification process, making it easier to protect your sensitive information, improve your data governance practices, and reduce the risk of data breaches.

Applying MPIP Labels

In order to apply Microsoft Purview Information Protection (MPIP) labels based on Sentra sensitivity labels, you are required to follow a few additional steps:

  1. Set up the Microsoft Purview integration - which will allow Sentra to import and sync MPIP sensitivity labels.
  2. Create tagging rules - which will allow you to map Sentra sensitivity labels to MPIP sensitivity labels (for example “Very Confidential” in Sentra would be mapped to “ACME - Highly Confidential” in MPIP), and choose to which services this rule would apply (for example, Microsoft 365 and Amazon S3).

Using Sensitivity Labels in Microsoft DLP

Microsoft Purview DLP (as well as all other industry-leading DLP solutions) supports MPIP labels in its policies so admins can easily control and prevent data loss of sensitive data across multiple services and applications.For instance, a MPIP ‘highly confidential’ label may instruct Microsoft Purview DLP to restrict transfer of sensitive data outside a certain geography. Likewise, another similar label could instruct that confidential intellectual property (IP) is not allowed to be shared within Teams collaborative workspaces. Labels can be used to help control access to sensitive data as well. Organizations can set a rule with read permission only for specific tags. For example, only production IAM roles can access production files. Further, for use cases where data is stored in a single store, organizations can estimate the storage cost for each specific tag.

Build a Stronger Foundation with Accurate Data Classification

Effectively tagging sensitive data unlocks significant benefits for organizations, driving improvements across accuracy, efficiency, scalability, and risk management. With precise classification exceeding 95% accuracy and minimal false positives, organizations can confidently label both structured and unstructured data. Automated tagging rules reduce the reliance on manual effort, saving valuable time and resources. Granular, contextual tags enable confident and automated remediation, ensuring operations can scale seamlessly. Additionally, robust data tagging strengthens DLP and compliance strategies by fully leveraging Microsoft Purview’s capabilities. By streamlining these processes, organizations can consistently label and secure data across their entire estate, freeing resources to focus on strategic priorities and innovation.

Read More
decorative ball